How to Document Damage So Insurance Claims Get Approved
Gloria · Jun 12, 2026
Storm damage can be obvious to a trained roofing inspector and still be difficult to prove in an insurance claim. A roofing team may find lifted shingles, hail impact marks, granule loss, damaged vents, or water intrusion, but if the photo record is unclear, the claim can still be delayed, reduced, or denied.
For roofing contractors, the issue is often not whether damage exists. The issue is whether the documentation clearly shows what happened, where it happened, when it happened, and why it connects to the covered storm event. This guide gives roofing teams a practical storm damage roof inspection workflow for capturing photos, organizing evidence, and preparing a claim-ready report that adjusters can review with less back-and-forth.
Why Documentation Makes or Breaks a Roofing Insurance Claim
Insurance adjusters do not approve storm claims based on a contractor’s statement alone. They need a record that supports three basic points: the damage exists, the damage is related to a covered storm event, and the damage belongs to the property and claim timeline being reviewed. When one of those points is weak, the claim becomes easier to question.
That is why documentation quality matters so much for roofing teams. A blurry close-up of a shingle may show something, but it does not prove which roof slope it came from, when the photo was taken, or whether the damage is related to the reported date of loss. A stronger photo record connects every close-up to the larger roof area, property address, inspection date, storm context, and damage type.
Before the Roof Inspection: Safety, Claim Context, and Storm Data
A good storm damage roof inspection starts before anyone climbs a ladder. First, confirm the property address, homeowner or property contact, claim number if available, and reported date of loss. Ask what the owner noticed after the storm: leaks, missing shingles, debris impact, gutter dents, ceiling stains, or water spots in the attic. These details help the roofing inspector focus the inspection and build a clearer timeline.
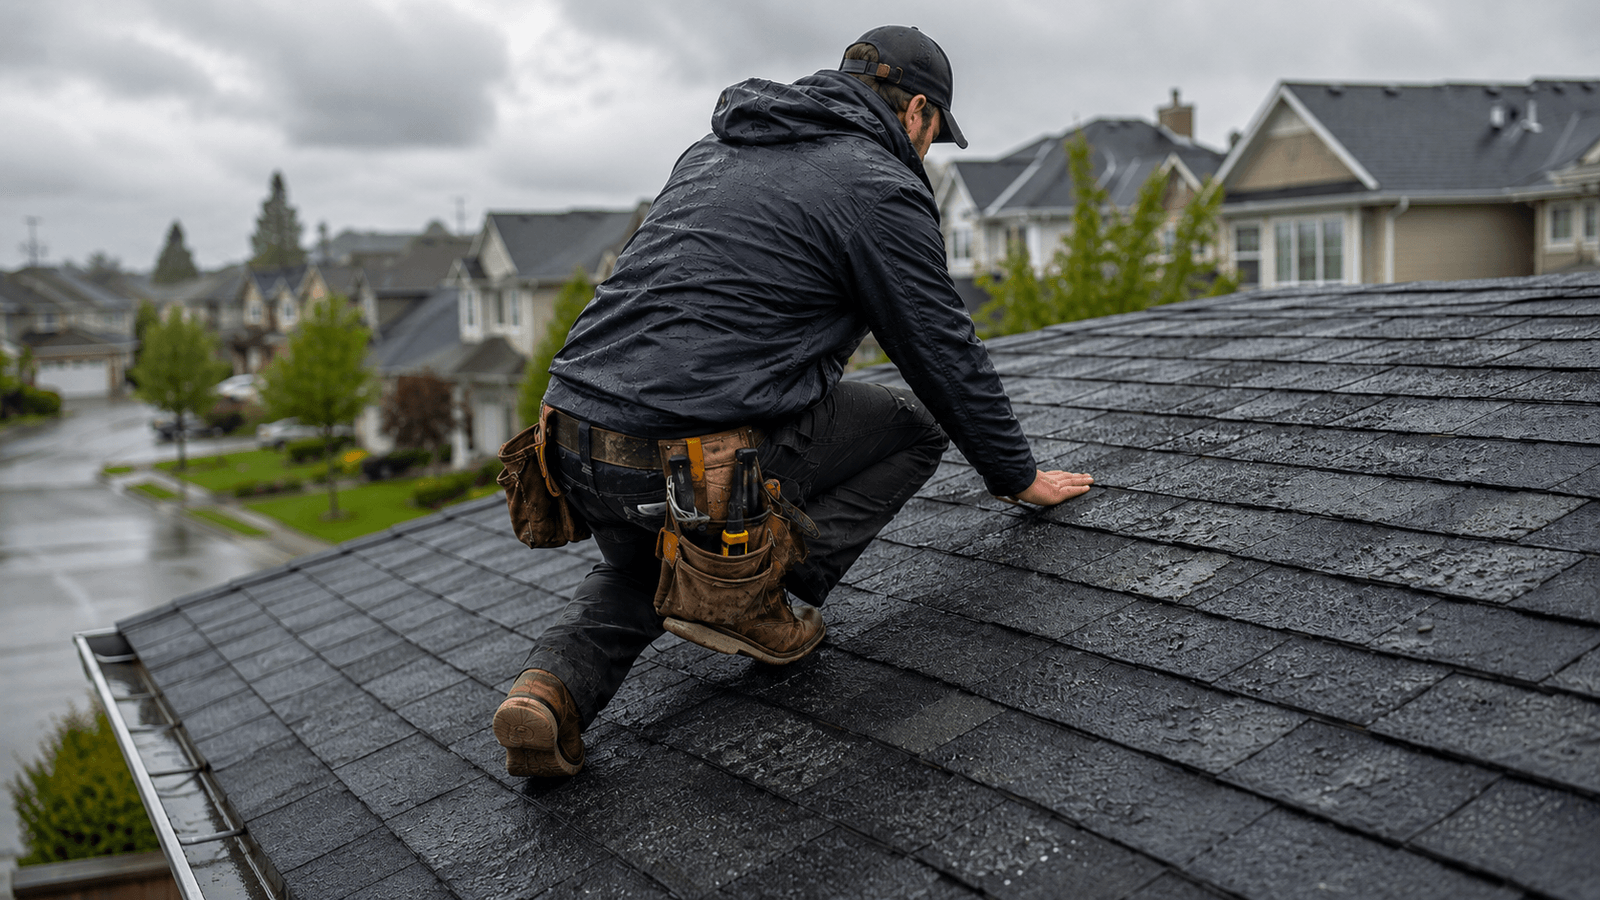
Before climbing, prepare the right tools: ladder, fall protection, chalk, measuring tape, inspection form, flashlight, soft shoes, camera or photo documentation app, and any safety equipment required by your company. Start with ground-level photos of the property, roof elevations, house number, gutters, downspouts, and visible exterior damage. If the roof is wet, steep, unstable, or unsafe, do not force the inspection. No claim is worth a fall.
What Adjusters Look For in Storm Damage Roof Inspections
Roofing teams need to understand what adjusters are trying to separate: storm-related damage, ordinary wear, poor installation, old repairs, and cosmetic issues. A strong inspection does not mix everything into one general “damage” folder. It documents each damage type clearly and shows why it matters.
For wind damage, the focus is different. Roofing inspectors should look for lifted shingles, missing shingles, creased tabs, broken seals, displaced ridge caps, edge damage, and areas where wind may have pulled, folded, or loosened roof materials. Wind damage can be hard to prove if the photos only show a lifted corner without context, so inspectors should show the surrounding roof plane, the direction of the slope, and nearby affected areas.
Falling debris damage should be documented separately from hail or wind. Tree limbs, flying objects, broken vents, punctures, cracked shingles, damaged flashing, and impact points should be photographed with both context and scale. If there is interior damage, document the attic, ceiling stains, wet insulation, wall staining, and the suspected leak path. The goal is not to overwhelm the adjuster with images. The goal is to show a clean line from storm event to roof damage to interior consequence.
The Roof Damage Photo Evidence Checklist
The strongest roof damage photos follow a simple pattern: wide, mid-range, close-up. This three-layer method helps adjusters understand both the location and the detail of the damage. It also prevents one of the most common documentation problems in roofing claims: a camera roll full of close-ups that no one can place on the roof.
Start with property and roof overview photos. Capture the house number or property sign, front elevation, each side of the property, full roof slopes, detached structures, garage, visible gutters, and any exterior damage. These photos prove that the inspection belongs to the correct property and help orient the rest of the report.
Next, take roof plane photos. Each slope should be photographed separately and labeled by direction when possible: north, south, east, west, front, rear, left, right, or whatever system your team uses consistently. The purpose is to show the affected roof area before zooming into individual damage points. If there is widespread hail impact, capture the pattern across the slope. If there is wind damage, show the affected edge, ridge, valley, or section of lifted shingles.
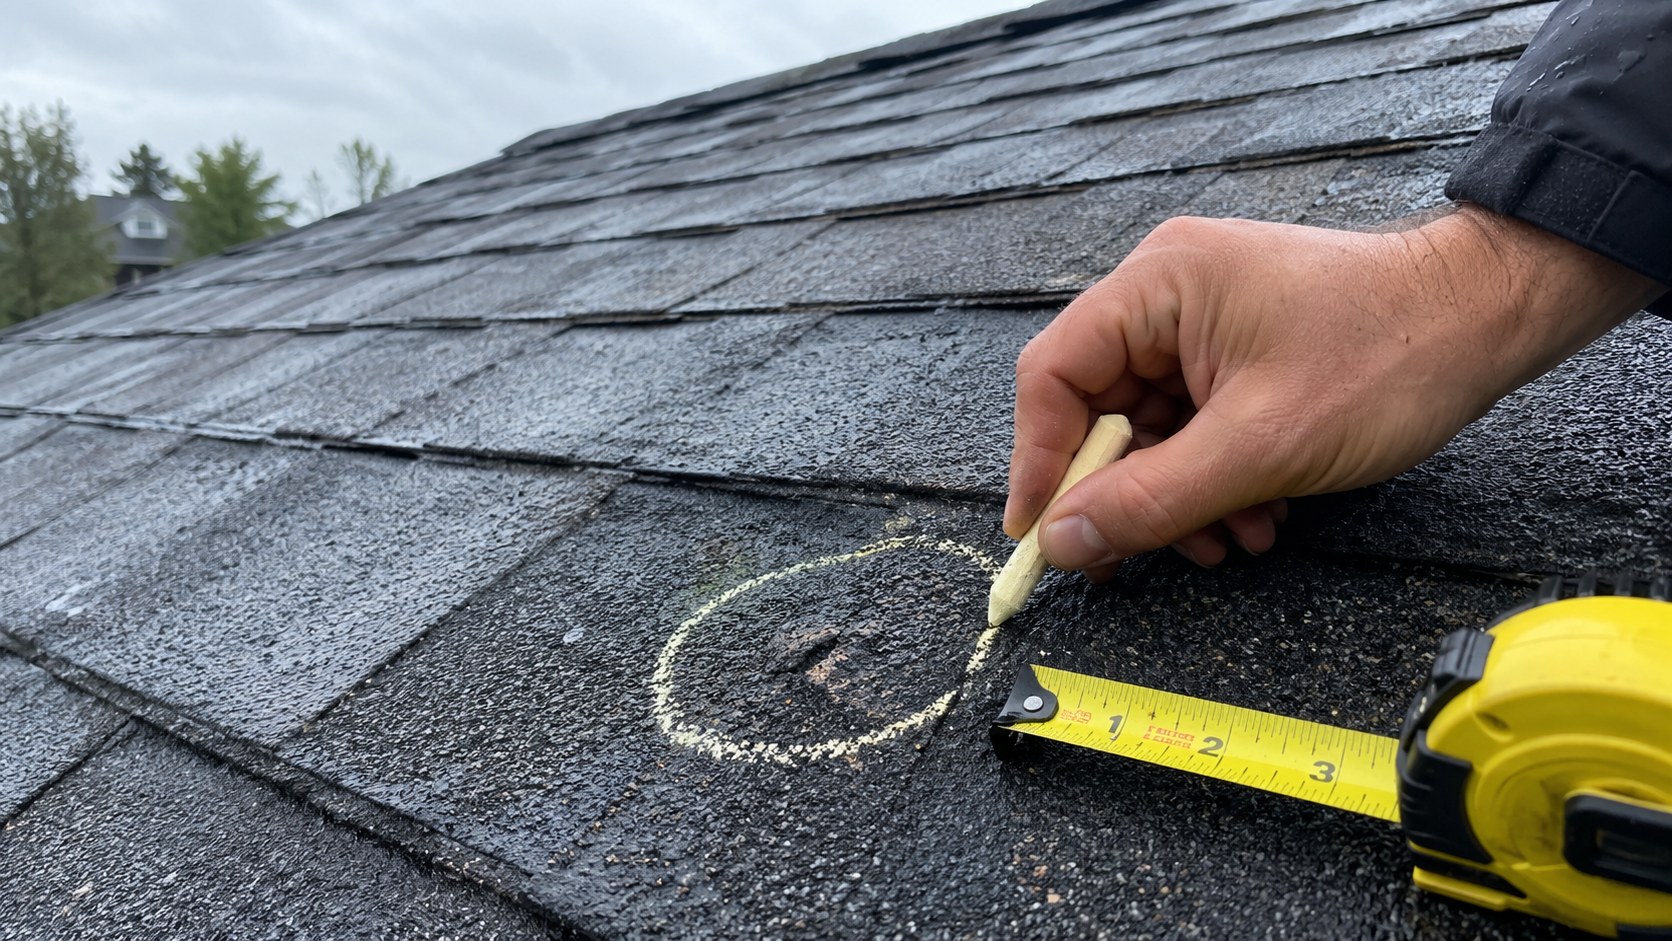
Then capture damage area photos. Use chalk to mark hail hits, lifted tabs, punctures, torn shingles, creases, exposed mat, or broken seals. A mid-range photo should show several marked damage points within the same roof area. This helps demonstrate that the issue is not isolated or randomly selected for a close-up.
Close-up photos should be sharp, steady, and scaled. Use a ruler, tape measure, chalk circle, or another consistent reference to show the size of the impact, tear, puncture, crease, or exposed area. For hail, show granule loss, bruising, soft metal dents, or mat exposure clearly. For wind, show broken seals, creases, lifted tabs, or missing shingles in a way that makes the damage visible without relying on verbal explanation.
Do not forget collateral damage. Gutters, downspouts, vents, flashing, window screens, siding, fences, AC fins, and metal accessories can help support the storm story. For roofing teams, these photos are not filler. They help show that the roof damage matches a broader hail or wind event at the property.
Finally, capture interior evidence when it exists. If the homeowner reports leaks, photograph attic staining, wet insulation, ceiling stains, wall stains, moisture marks, and any visible leak path. These images should be tied back to the roof area when possible. A ceiling stain without roof context is weaker than a sequence that shows the roof slope, damaged area, attic path, and interior result.
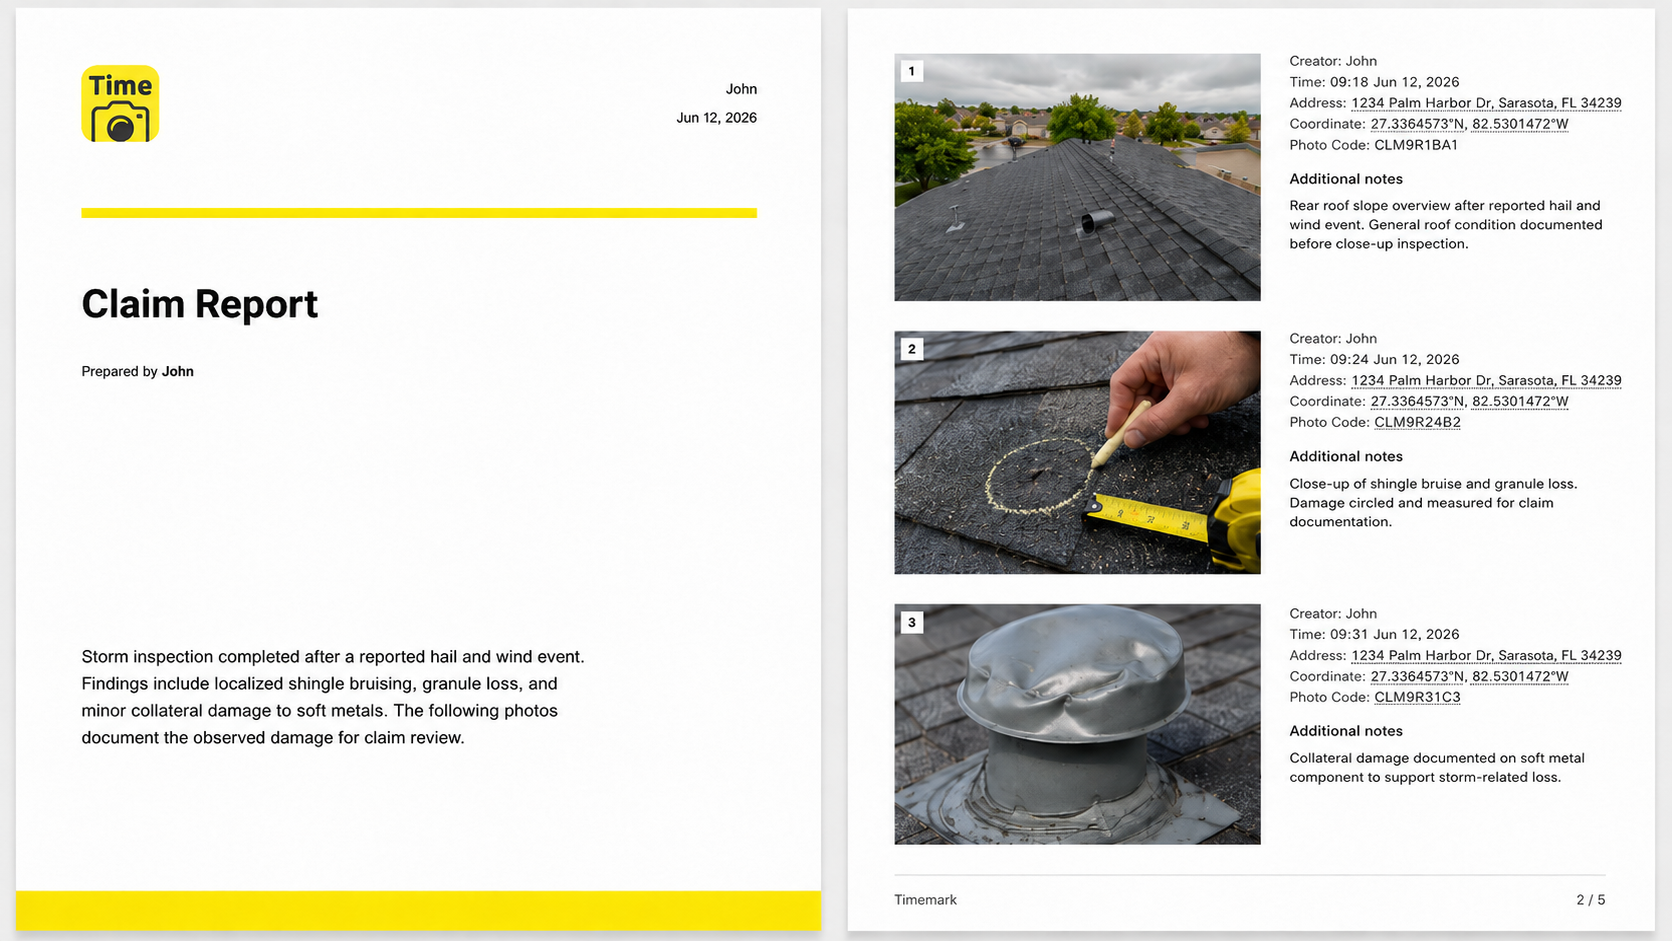
Every photo should carry the right context: date, time, GPS location, address, roof area, damage type, and notes. Without that information, the team may still have useful images, but the claim package becomes harder to defend.
The Details That Quietly Get Roofing Claims Denied
Some roofing claims are not weakened by one obvious mistake. They are weakened by small documentation gaps that give the adjuster room to question the evidence. Roofing teams can avoid many of these issues with a tighter inspection workflow.
The first gap is an unclear date of loss. If the report does not connect the inspection to a specific storm event, the insurer may question whether the damage is new, old, or caused by another event. The fix is simple: record the reported date of loss, inspection date, relevant storm data, and photo timestamps in the same file.
The second gap is missing location proof. A close-up of shingle damage does not prove which property or roof plane it came from. Each inspection should include property overview photos, roof plane photos, and organized folders or labels by property and slope. This is especially important for roofing companies inspecting multiple homes in the same neighborhood after a storm.
The third gap is too many close-ups and not enough context. Close-ups are necessary, but they are not enough on their own. Each close-up should be supported by a mid-range photo and an overview photo, so the adjuster can trace the damage from the property to the roof plane to the exact damage point.
The fourth gap is mixing old wear with storm damage. Normal aging, blistering, foot traffic, old repairs, poor installation, and manufacturer defects can all appear in roof photos. If those items are mixed with storm damage without explanation, the whole claim can become less credible. Roofing inspectors should separate storm-related findings from non-storm conditions and label them carefully.
The fifth gap is missing measurements. Damage photos are easier to evaluate when the scale is visible. A ruler, tape measure, chalk mark, or consistent reference object can make a close-up more useful. This matters for hail impacts, punctures, tears, missing materials, and interior stains.
The sixth gap is documenting after temporary repairs instead of before. If emergency tarping, sealing, or patching is needed, take photos before the repair, during the repair, and after the repair. Temporary repairs may be necessary to prevent further damage, but they should not erase the original evidence.
The final gap is scattered storage. When photos are split across personal phones, text messages, email threads, and cloud folders, the team loses control of the evidence chain. A roofing company should keep inspection photos organized by property, date, claim, roof plane, and damage type from the beginning.
How to Turn Roof Photos into a Claim-Ready Report
A claim-ready report should make the adjuster’s job easier. It should not force them to open dozens of loose images and guess what each photo shows. The report should organize evidence in the same order a reviewer would think through the claim.
Start with basic property information: address, homeowner or property contact, inspection date, date of loss, roofing company, inspector, and claim number if available. Then add a short storm event summary, including hail, wind, falling debris, or water intrusion details. Keep this section factual and concise.
Next, include a roof system overview. Note the roof type, approximate age if known, number of slopes, visible roof condition, and areas inspected. This helps the adjuster understand the context before reviewing damage photos. Do not overstate conclusions. The report should be clear, not exaggerated.
The photo log should be organized by roof plane and damage type. For example: Front slope hail impacts, rear slope wind damage, left slope soft metal damage, gutters and downspouts, interior leak evidence. Each photo should include a short note, measurement when relevant, and location context. A good photo note does not need to be long. “Rear slope, hail impact with granule loss, 1-inch reference” is more useful than a vague “damage found.”
If temporary repairs were completed, include photos and receipts in a separate section. If interior water intrusion exists, include it after the roof exterior evidence and connect it to the suspected roof area. If a supplement may be needed, make sure the missing or under-scoped items are clearly documented.
Common Mistakes Roofing Teams Should Avoid
Roofing companies can improve claim documentation quickly by removing a few common habits that weaken the evidence.
- Do not wait days or weeks to inspect if the property owner is ready and the roof is safe to access. Delays create more uncertainty around the date of loss and the condition of the roof after the storm.
- Do not take only close-up photos. Close-ups show detail, but overview and mid-range photos prove location, pattern, and context.
- Do not forget collateral damage. Gutters, downspouts, vents, flashing, siding, screens, fences, and AC fins can help support the storm event when documented properly.
- Do not skip roof plane labels. If the adjuster cannot tell where the photo came from, the photo is less useful.
- Do not rely on memory for notes. Record the roof area, damage type, measurement, and observation while still on site.
- Do not complete temporary repairs before documenting the original damage. If urgent repairs are needed, take photos before, during, and after the work.
- Do not mix photos from multiple properties in one folder. This is especially risky after neighborhood-wide hail events when roofing teams may inspect several homes in a single day.
- Do not send loose photos when a report is possible. A structured report makes the claim easier to review and shows that the roofing team understands the insurance documentation process.
Better Roof Photos Make Better Claims
Storm claims are not supported by photo volume alone. They are supported by a clear evidence chain: property overview, roof plane context, damage area, close-up detail, measurement, time, location, and connection to the storm event. When that chain is complete, the roofing team can communicate with the homeowner and adjuster more confidently.
For roofing contractors, storm damage documentation should be a repeatable field process. Start with claim context and storm data, inspect safely, photograph each roof area in a consistent order, separate storm damage from ordinary wear, capture collateral and interior evidence, and turn the photos into a structured report.
About Timemark
Timemark is a jobsite photo documentation app with timestamp, GPS geotag, and on-site notes. With Teamspace, field teams can automatically collect, organize, search, and export job photos across projects.
Timemark empowers construction, field service, telecom, and transportation teams to capture verifiable job photos to prevent disputes, support claims, and ensure project transparency. Timemark makes job photos trusted, organized, report-ready, and searchable. For setup instructions and product guidance, visit the Timemark Help Center.